Setup silent-shard-sdk in React Native Expo
Step 1: Create CustomWebScoketClient.ts
Create a file CustomWebScoketClient.ts in the services folder.
CustomWebScoketClient.ts code
import { SilentShardWebSocketClient } from '@silencelaboratories/silent-shard-sdk'
import { Buffer } from 'buffer'
import { firebaseAuth } from './FirebaseAuthService'

global.Buffer = Buffer

export default class CustomWebSocketClient extends SilentShardWebSocketClient {
  _isFirstMessage = true
  _url = ''

  override async connect(url: string, protocols: string[]) {
    this._isFirstMessage = true
    this._url = url
    await super.connect(url, protocols)
  }

  override async sendText(data: string) {
    if (this._isFirstMessage) {
      const authMessage = await this.handleAuth(data)
      super.sendText(authMessage)
      this._isFirstMessage = false
    } else {
      super.sendText(data)
    }
  }

  async handleAuth(data: string): Promise<string> {
    const jsonData: Record<string, string> = JSON.parse(data)

    // Get Firebase ID token (this is what the backend expects)
    const token = await firebaseAuth.getFirebaseIdToken()
    if (!token) {
      throw new Error('No Firebase ID token available. Please sign in first.')
    }

    console.log('🔑 WebSocket: Using Firebase ID token for authentication')
    return `${JSON.stringify(jsonData)}, ${token}`
  }
}
Step 2: Update index.tsx
index.tsx code
import CustomWebSocketClient from "@/services/CustomWebScoketClient";
import { FirebaseAuthService } from "@/services/FirebaseAuthService";
import { onGoogleButtonPress } from "@/services/onGoogleButtonPress";
import { GoogleSignin } from "@react-native-google-signin/google-signin";
import {
  CloudWebSocketClient,
  EcdsaSession,
} from "@silencelaboratories/silent-shard-sdk";
import { Button, SafeAreaView } from "react-native";

export default function Index() {
  return (
    <SafeAreaView>
      <Button
        title="Sign in with Google"
        onPress={async () => {
          // await onGoogleButtonPress();
          await FirebaseAuthService.getInstance().signInWithGoogle();

          const cloudVerifyingKey =
            "your cloud verifying key";

          const customWebSocketClient = new CustomWebSocketClient();
          const client = new CloudWebSocketClient(
            "0.0.0.0:9090",
            false,
            customWebSocketClient
          );

          const config = {
            client,
            cloudVerifyingKey,
          };

          const session = new EcdsaSession(config);

          const keyshare = await session.keygen();

          console.log("🚀 keyshare:", keyshare);
          const messageHash =
            "74284b01d61a3964ace4d7ac42c62986e41515aa2d06641431d7dfb3df647289";

          const signature = await session.sign({
            keyshare,
            messageHash,
          });

          console.log("🚀 signature:", signature);

          const refreshedKeyshare = await session.refresh(keyshare);
          console.log(
            "🚀 refreshedKeyshare:",
            refreshedKeyshare
          );
        }}
      />
    </SafeAreaView>
  );
}
Step 3: Update cloudVerifyingKey
Update the cloudVerifyingKey in the index.tsx file.
You will get the cloud verifying key from the server when you run the docker compose.
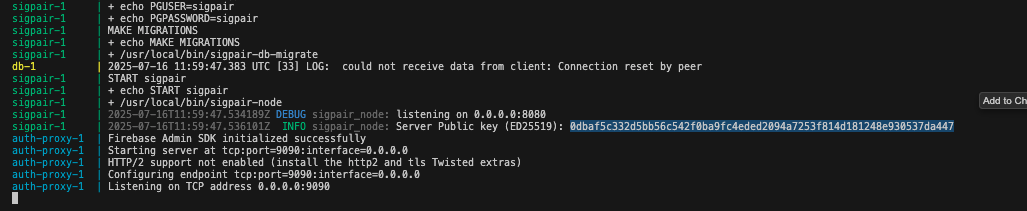
This is changed with each run of the docker compose.
Step 4: Run the project
npx expo start
Step 5: (Optional)
If you have different auth proxy server, you can update the 0.0.0.0:9090 to the server url.